
Elegant White Christmas Decor | Christmas Craft With Me
Looking for DIY dollar store Christmas decor ideas? I’ve got you covered with these elegant white Christmas crafts. We’ll make a large Christmas tree out of poster board, a shabby chic feather wreath and a beautiful sign to bring peace into your holiday season. Come Christmas craft with me as we make some beautiful home decor!
I also created this video, in case you want to watch all these crafts come to life. Click the image below to watch.

// DIY white feather wreath
We’ll be using a Dollar Tree hula hoop to get a really large sized wreath for not much money. I had already spray painted one side of this hula hoop for another project, that’s why there are a few patchy spots where I took off the old Fall decorations. But we’ll be covering all that up, so no worries.

You can find these feather boas in the kids section at Dollar Tree and I wrapped this around the hula hoop, glueing it down in a few places.
After wrapping the boa, I held the wreath upright to see how the feathers would hang and saw there were a few bare spots so I adjusted the feathers to cover those empty areas and glued them in place.

The boa didn’t go all the way around, but we’re going to put some white ribbon there and that will be the top of our wreath where the bow will go.

My Dollar Tree is starting to run low on Christmas supplies, so if you’re looking for any of the items I use today, you may want to plan a shopping trip soon before all the good stuff is picked over.

I did find this wooden sign a few days ago at my Dollar Tree. I’m painting it with some greige paint and a foam roller brush.


Now we’ll create a bow for the top of the wreath. For my bows I like to loop the ribbon back and forth a few times.
Then I cut 2 small notches, on both sides of the middle. I use some floral wire to secure it in the middle.

Finally, I pull out the loops to open it up. I had done this with two types of ribbon and attached them to create one big bow.

I’m using some pearl beads that I found on Amazon to hang the “merry and bright” sign to the hula hoop. I wrapped that beading it around the top of the sign and then to the top of the hula hoop.

To make sure it didn’t slide down the sides, I added a bit of glue on the back to keep the pearl hangers in place.

I took some of that large white wired ribbon and created pleats by folding it back and forth and using a few dots of glue along the way. We’ll glue this under the bow and have it like it’s cascading down the side of the wreath.


These bells were a recent find at Dollar Tree. They’re on a string and I think I want to hang them somehow on our sign.

But before we do that…I don’t know what came over me. I usually do my designs really elegant and simple, but I felt like the wooden letters needed a little sparkle.
I used Mod Podge and iridescent snow on top of that greige paint and I think it turned out ok. Let me know if you like the bit of glam on this wreath in the comments section below.

Here is how the final wreath came out. I think it looks so festive on my red front door!

// poster board tree
Let’s make a giant Christmas tree out of one piece of Dollar Tree poster board.
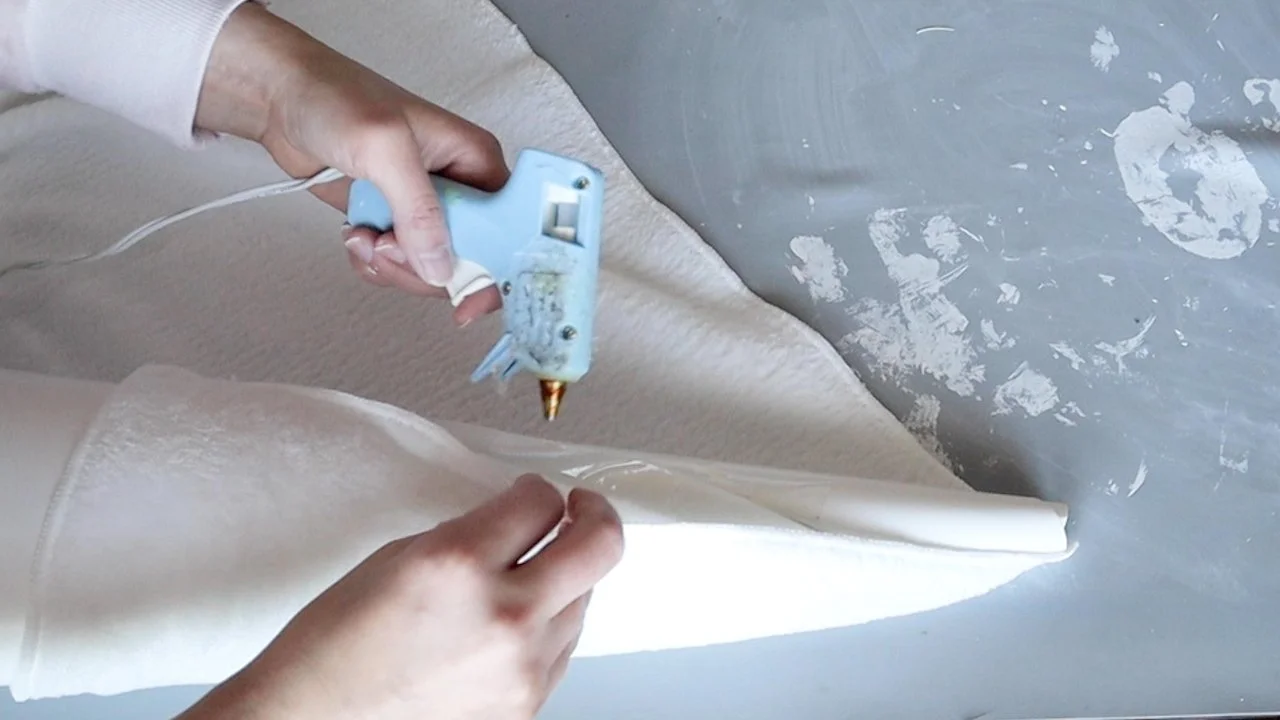
I took one corner and rolled up the poster board keeping that one side tight, because that will be the top of the tree. Use some packing tape to seal the edge.

I trimmed off the uneven edge at the bottom. I stood it upright to see how straight it was and then trimmed off a little bit of the edge to get it to sit perfectly straight.


This microfiber cloth from Dollar Tree will make a really nice fabric covering for our tree. I used glue along the edges to secure the fabric to the poster board.
I would recommend picking up 2 of those microfiber car cloths at Dollar Tree. I did have some scraps from another microfiber cloth, but just so you know if you are using the one piece of poster board, it would be best to have 2 cloths handy.
Now for the decoration, we’ll be using some of that pearl beading. I’m glueing this on top of the seams and then wrapping it all around.

You can find these silver and white ornaments at Dollar Tree. They’re made of foam and have a little sparkly glitter on them. All I did was hot glue these to any empty spots to give this tree a little more decoration.

I created a stand to give my tree some extra height, but this part is optional. You could just use the tree as it is and place it on a table or even the floor since it’s so tall. Or you could use a small crate and set it on top of that. There are lots of ways to customize how you display your tree.
I had painted this pot white and added that ribbon when I made some topiaries. I’ll swap out that ribbon for a white one with silver trim to match the ornaments we added to the tree. The top is just a piece of foam core I cut to size and added some moss on with a bit of glue.

Here’s how it came out! I ended up adding a little white poinsettia since the top looked like it needed “something”.

// peace sign
This is a huge tray from Dollar Tree, which I found in the party supplies section. It’s 16” in diameter, so will make us a nice large sign. It’s actually a plastic tray but the silver color makes it look like metal. The rope trim edge looks really dressy.

We’re going to decorate the center of the tray. Contact paper or wrapping paper are great Dollar Tree options for this part. I’m going to go with this snowflake wrapping paper.
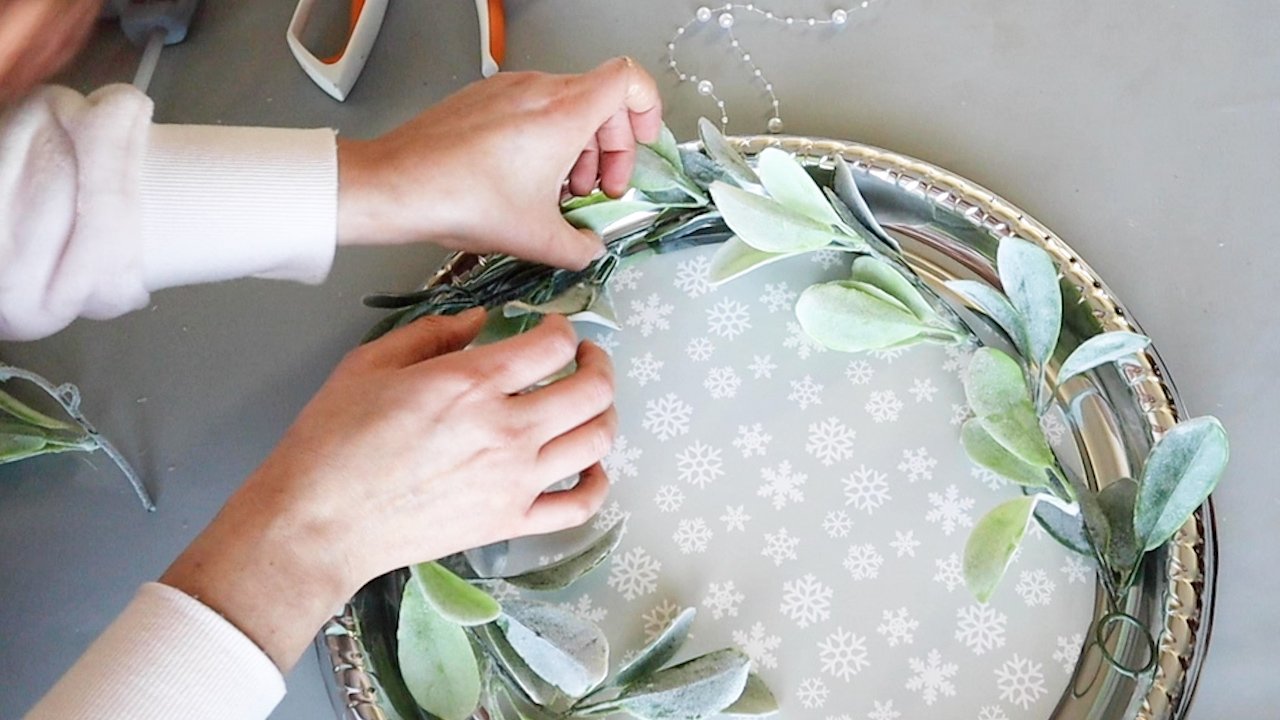
I flipped the tray over and felt where the edge was and traced a circle. This doesn’t have to be perfect because we’ll be covering up the edge with some greenery.

I cut the circle out and then used Super 77 on the back and then smoothed it onto the center of the tray.

A hole puncher will go through this plastic tray, so I punched a hole in the edge so we could loop some of those pearls through as a way to hang this sign.


Whatever greenery or flowers you want to go with here will work. I had some lamb’s ear and am attaching that carefully, only where I need to use glue, because I do like to go back and re-use my florals on projects. I try to not use so much glue that it will destroy the backs of the florals.

This was another sign I picked up a couple days ago at Dollar Tree. This is made of a particle type wood and will fit our tray perfectly. I will probably end up glueing it on the edges to look like it’s floating over the greenery. But first I want to paint it white.
I thought because there were only a few letters that this would be easy to hand paint, but getting in all the nooks and crannies was a bit of work! You may want to use spray paint for this part if you want it to go a little faster.

I added a few white poinsettias to finish off the sign.

And here is our finished piece. I love how this came out and looks so pretty hanging on my office door.


I hope you were inspired by these Christmas DIYs. Check out my other posts below for more crafting ideas!


FTC: Not Sponsored. All opinions are always 100% honest and my own. Some links may be affiliate links. If you click a link and buy something, I receive a small commission for the sale. It doesn’t cost you anything extra and you are free to use the link or not as you choose. If you do use my links, I appreciate your support.
How about some Target Dollar Spot crafts and Dollar Tree coastal transformations. We’ll be putting together tiered tray miniatures to decorate our little coastal vignette.